
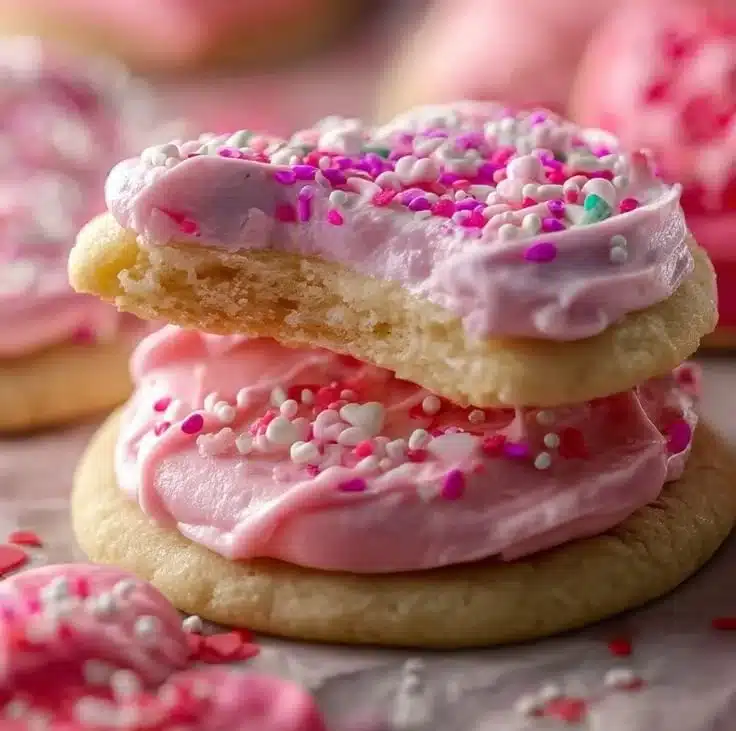

How to make Valentine’s Day Cookies
Valentine’s Day is the perfect time to show your love, and what better way to do that than with delicious cookies? These Valentine’s Day cookies are sweet, soft, and decorated beautifully for the occasion. Follow the simple steps below for a festive treat that will make your heart, and those of your loved ones, flutter!
Ingredients
- 1/2 cup butter (Salted or unsalted, softened)
- 1/2 cup granulated sugar
- 2 tbsp brown sugar
- 1 large egg white
- 1 tsp vanilla
- 1 1/3 cup all-purpose flour (plus 1 tbsp)
- 1/2 tsp baking soda
- 1/4 tsp baking powder
- 1/4 tsp salt
- 1/2 cup butter (softened)
- 1 cup powdered sugar
- 1 tbsp cream
- 1 tsp vanilla extract
- pink gel food coloring
- Valentine’s Day sprinkles
Directions
-
Preheat your oven to 350°F (175°C). While the oven warms up, line a large baking sheet with parchment paper and set it aside.
-
In a stand mixer, cream the softened butter, granulated sugar, and brown sugar together using a paddle attachment. Mix until the mixture becomes light in color and fluffy.
-
Add in the egg white and the vanilla extract. Mix again for about 30 seconds or until everything is fully combined.
-
Next, add in the all-purpose flour, baking soda, baking powder, and salt. Mix just until the flour disappears. Be careful not to overmix.
-
Using a small cookie scoop, scoop out equally sized cookie dough balls onto the prepared baking sheet.
-
Place the baking sheet in the preheated oven and bake the cookies for about 8 minutes. They should be slightly golden at the edges.
-
Remove the cookies from the oven and let them rest on the cookie sheet for 5-10 minutes. This makes them easier to handle.
-
After resting, transfer the cookies to a cooling rack. Enjoy them warm or store them in an airtight container.
-
To make the frosting, cream the butter in a bowl until it’s light and fluffy.
-
Add in the powdered sugar, vanilla extract, and cream. Whip the mixture again until fluffy.
-
Add in the pink gel food coloring and whip again until you achieve your desired color.
-
Once the cookies have cooled, frost each one generously with the prepared pink frosting and top it off with Valentine’s Day sprinkles. Enjoy your lovely cookies!
Why You’ll Love This Valentine’s Day Cookies
These Valentine’s Day cookies are not only delightful to look at but also extremely tasty. They are soft, slightly chewy, and have a perfect balance of sweetness. The pink frosting adds a special touch, making them ideal for sharing. Whether you’re treating yourself or surprising someone special, these cookies are sure to bring smiles.
Nutritional Benefits
Cookies can be a delightful treat, and while they are meant to be enjoyed in moderation, here’s a look at some of the nutritional aspects:
- Butter provides fats which can help in vitamin absorption.
- Sugar gives you quick energy, though it’s best to have it in moderation.
- Eggs contain protein and important minerals.
- Using whole grain flour, if you prefer, can add extra fiber to the cookies.
What to Serve With Valentine’s Day Cookies
These cookies are delicious on their own, but you can pair them with:
- A glass of cold milk for a classic combination.
- A warm cup of coffee or tea for an afternoon treat.
- Fresh fruits like strawberries or blueberries for a touch of freshness.
How to Store Valentine’s Day Cookies
To keep your cookies fresh, store them in an airtight container. They can last for about a week at room temperature. If you live in a humid environment, refrigerate them to prolong their freshness. Just be sure to bring them back to room temperature before serving for the best texture.
Tips and Mistakes to Avoid
-
Soften the Butter: Make sure your butter is truly softened. This helps in better mixing and results in fluffier cookies.
-
Don’t Overmix: When adding flour, stop mixing once it disappears to avoid tough cookies.
-
Use Parchment Paper: Always line your baking sheet with parchment paper for easy removal and to prevent sticking.
-
Cool the Cookies: Be patient and let your cookies cool properly before frosting to ensure the frosting doesn’t melt.
-
Measure Accurately: Use a proper measuring cup for dry ingredients to avoid too much flour, which can lead to dry cookies.
Variations
You can easily customize these cookies for different flavors or occasions:
- Chocolate Chip Variation: Add chocolate chips to the dough for a sweet surprise.
- Different Frosting: Use white chocolate or a different color for the frosting to match your theme.
- Nutty Delight: Mix in nuts like chopped pecans or almonds for added crunch.
FAQs
Can I use salted butter instead of unsalted?
Yes, you can use salted butter, but adjust the added salt in the recipe accordingly or omit it to maintain the right balance of flavors.
Can I freeze these cookies?
Yes! You can freeze the cookie dough before baking or freeze the baked cookies. For baked cookies, let them cool completely first, then store them in an airtight container or freeze in a single layer on a baking sheet before transferring.
Is it necessary to use gel food coloring?
Gel food coloring provides a richer color with less liquid, but you can use liquid food coloring instead if that’s all you have. Just adjust the amount to achieve the desired color.
What if I don’t have a stand mixer?
You can still make these cookies using a hand mixer or even just a sturdy whisk and bowl. It may take a little more effort, but it will still work.
Can I use gluten-free flour?
Yes, you can substitute all-purpose flour with a gluten-free all-purpose flour mix, which should work similarly. Be sure to check for any other gluten-containing ingredients.
These Valentine’s Day cookies are simple to make and sure to impress anyone on your list. With their lovely appearance and delicious taste, they make your celebration of love that much sweeter. Happy baking!