
How to make Ocean Ice Melt Activity
Ingredients:
- Water
- Food coloring (blue and green)
- Small plastic ocean animals or toys (like fish, sea turtles, etc.)
- Cup or small container for ice
- Baking tray or shallow dish
- Salt
- Spoon
- Timer (optional)
Directions:
-
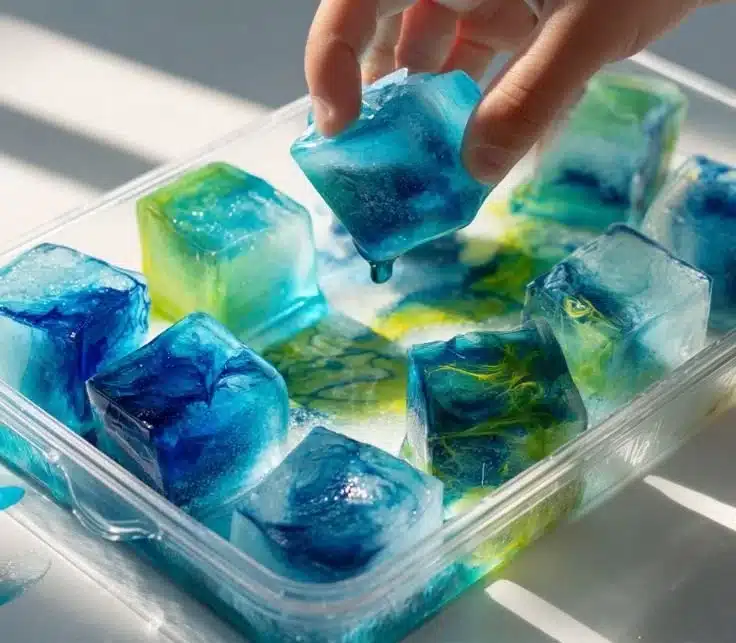
Create Your Ocean: Start by filling the cup or small container with water. Add a few drops of blue and green food coloring to mimic the ocean water. Stir well to mix.
-
Add the Animals: Place the small plastic ocean animals or toys in the container with the colored water. Ensure they have enough space to float around.
-
Freeze: Put the container in the freezer and wait for several hours or overnight until it’s completely frozen.
-
Prepare for the Activity:Once your ocean ice is ready, remove it from the freezer. Take out the ice block and place it in the middle of the baking tray or shallow dish.
-
Salt Time: Sprinkle salt evenly over the top of the ice block. Watch closely as the salt begins to melt the ice!
-
Observe: Set a timer if you want to track how long it takes for the ocean animals to start appearing. Encourage kids to observe and discuss the changes they see.
-
Continue the Fun: You can continue to sprinkle more salt as needed and watch how the animals are freed from the ice.
Why You’ll Love This Ocean Ice Melt Activity
The Ocean Ice Melt Activity is perfect for curious kids who love hands-on experiments. It combines science and fun in a way that keeps children engaged and learning. Children get to see how salt affects ice, which can lead to discussions about the real ocean as well. Plus, it’s an enjoyable way to learn about ocean life and the effects of temperature and salinity on sea creatures. This activity not only entertains but also educates kids about basic scientific principles in a visually appealing manner.
Nutriments Benefits
While this activity does not involve food, it introduces kids to key concepts in science. They can learn about the properties of water, ice, and salt. Understanding these principles is crucial for children, as it builds their foundational knowledge in science. Moreover, incorporating interactive play with ocean animals can help broaden their understanding of marine life.
What to Serve With Ocean Ice Melt Activity
This activity can be enhanced with some fun ocean-themed snacks! Consider serving blue Jell-O or ocean-themed cookies to complement the theme. You could also have a discussion about marine animals while enjoying these tasty treats.
How to store Ocean Ice Melt Activity
This activity is meant to be done live and does not require storage. However, if there are leftover ocean animals or extra salt, you can simply store these in a dry place for future activities. Make sure to keep your ice mold clean and dry before the next use.
Tips and mistakes to avoid
-
Choose the Right Container: Ensure the container used for freezing is not too deep. This would make it difficult to see the animals once frozen.
-
Timing is Key: Leave the ice in the freezer long enough for it to solidify completely. If it’s not frozen thoroughly, it won’t melt properly with the salt.
-
Watch the Salt: Use just enough salt to observe the melting effect without overwhelming the ice. Too much salt can cause a rapid melting process and may not be as visually stimulating.
-
Engage the Kids: Ask questions during the activity to keep kids engaged. For example, ask them what they think will happen when salt is added to the ice.
Variation (if any)
You can vary this activity by using different colors for the water or adding edible glitter to represent ocean waves. You can also introduce different ocean themes, like creating a “coral reef” by adding coral-shaped toys or even using different animal figures from other ecosystems.
FAQs
1. Can we use different types of animals?
Yes! You can use any small toys or figures that fit the ocean theme. Just make sure they are safe and non-toxic for kids.
2. What if we don’t have food coloring?
If you don’t have food coloring, you can skip this step, but the ice will be clear. You can discuss with the kids how ocean colors come from things like algae, which could be an educational moment!
3. How long will it take for the ice to melt?
The melting time will vary based on the amount of salt used and the room temperature. Typically, the ice will start melting within a few minutes to an hour.
4. Is this safe for children?
Absolutely! This activity is safe for children. Just ensure they do not consume any salt and supervise them closely during the experiment.
This hands-on activity offers a delightful blend of fun and learning. It’s a fantastic way to spark an interest in science and the mysteries of the ocean!
Print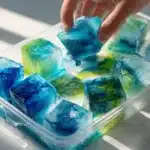
Ocean Ice Melt Activity
- Total Time: 390 minutes
- Yield: 1 activity session
- Diet: N/A
Description
A fun and educational hands-on activity for kids that demonstrates the melting properties of ice using salt while exploring marine life.
Ingredients
- Water
- Food coloring (blue and green)
- Small plastic ocean animals or toys
- Cup or small container for ice
- Baking tray or shallow dish
- Salt
- Spoon
- Timer (optional)
Instructions
- Create Your Ocean: Fill the cup or small container with water and add blue and green food coloring. Stir well.
- Add the Animals: Place plastic ocean animals in the colored water.
- Freeze: Put the container in the freezer until it’s completely frozen.
- Prepare for the Activity: Remove the ice from the freezer and place it in the baking tray.
- Salt Time: Sprinkle salt over the ice and observe the melting process.
- Observe: Use a timer to track how long it takes for the animals to appear.
- Continue the Fun: Sprinkle more salt as needed and watch the animals come free.
Notes
Choose a shallow container for better visibility of the animals. Ensure adequate freezing time for proper melting.
- Prep Time: 30 minutes
- Cook Time: 360 minutes
- Category: Activity
- Method: N/A
- Cuisine: N/A
Nutrition
- Serving Size: 1 creative play session
- Calories: 0
- Sugar: 0g
- Sodium: 0mg
- Fat: 0g
- Saturated Fat: 0g
- Unsaturated Fat: 0g
- Trans Fat: 0g
- Carbohydrates: 0g
- Fiber: 0g
- Protein: 0g
- Cholesterol: 0mg