
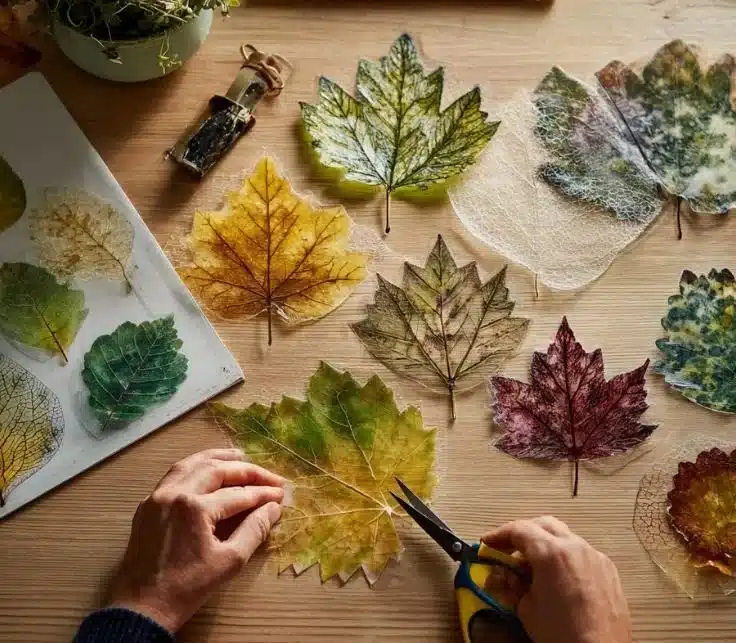

How to make Melted Wax Paper Leaf Suncatchers
Creating melted wax paper leaf suncatchers is a delightful fall craft that brightens up your home while being a fun activity for kids. This project allows children to explore creativity and learn about the changing seasons. With vibrant colors and exciting textures, these suncatchers capture the beauty of autumn. Here’s how you can make them!
Ingredients:
- Crayons (in fall colors like red, orange, yellow, and brown)
- Wax paper
- An iron
- Parchment paper or newspaper (to protect your ironing surface)
- Scissors
- Leaf templates (you can draw your own or print some)
- String or yarn (for hanging)
- Tape or glue (optional)
Directions:
-
Prepare Your Workspace: Start by gathering all your materials. Find a flat, safe surface to work on, and lay down your parchment paper or newspaper to protect it from any crayon wax that might spill.
-
Shave the Crayons: Use a pencil sharpener or a knife to carefully shave the crayons into small pieces. Aim for tiny flakes that will melt easily. You can mix different colors together to create unique shades.
-
Cut the Wax Paper: Take the wax paper and cut it into rectangles (about 10×12 inches). You will need two pieces for each suncatcher.
-
Spread the Crayon Shavings: Lay one piece of wax paper down. Sprinkle the crayon shavings onto the wax paper. Feel free to create interesting patterns or simply spread the colors across the paper.
-
Cover with Another Piece of Wax Paper: Place the second piece of wax paper over the crayon shavings, creating a “sandwich” effect.
-
Melt the Crayon Shavings: Turn on your iron to a low setting without steam. Place the parchment paper over the wax paper sandwich. With gentle pressure, run the iron over the top. Move the iron in circles to help melt the crayon shavings evenly. Be cautious not to hold it in one place for too long, as you could burn the wax paper.
-
Let It Cool: After a few seconds of ironing, check the melted crayons. Once you notice the colors are blended together and melted, remove the iron. Let the wax paper cool for a minute.
-
Cut Out Leaf Shapes: Use your leaf templates to trace and cut out leaf shapes from the melted wax paper. You can also create your own leaf designs if you’re feeling creative!
-
Add String for Hanging: If you want to hang your suncatchers, cut a small piece of string or yarn and tape or glue it to the top of your leaf shapes.
-
Display Your Suncatchers: Finally, find sunny windows in your home to hang your beautiful leaf suncatchers. Enjoy the way they catch the light and add a touch of fall to your decor.
Why You’ll Love This Melted Wax Paper Leaf Suncatchers
Creating melted wax paper leaf suncatchers is a wonderful activity that combines art, learning, and family time. Kids love to see their colorful creations catch the sunlight, and it’s a great way to introduce them to autumn’s beauty. Not only does it enhance their creativity, but it also encourages hand-eye coordination as they work with scissors and crayons.
Nutriments benefits
While this craft does not have nutritional benefits in the traditional sense, it offers several developmental benefits for children. Engaging in hands-on activities like this can enhance fine motor skills, improve concentration, and stimulate creativity. Additionally, working with colors can help children learn about color mixing and the beauty of nature.
What to Serve With Melted Wax Paper Leaf Suncatchers
These suncatchers can be accompanied by various autumn-themed activities. Consider pairing this craft with a fall storytime session where you read books about leaves, trees, and the changing seasons. You could also complement it with seasonal snacks such as apple slices, pumpkin muffins, or warm cider to create a cozy atmosphere.
How to store Melted Wax Paper Leaf Suncatchers
If you wish to save your melted wax paper leaf suncatchers for the following year, keep them in a flat, dry place away from direct sunlight to prevent them from melting or warping. Wrap them carefully in tissue paper to protect them from scratching. You may also consider placing them in a box to avoid any accidental damage.
Tips and mistakes to avoid
- Use Low Heat: Always keep the iron on a low setting to avoid burning the wax paper. High heat can lead to a melted mess.
- Watch Your Kids: If the kids are involved, keep a close eye on them while they are working with the iron to ensure safety.
- Experiment: Allow kids to experiment with crayon colors. They might come up with beautiful unexpected designs!
- Avoid Overloading: Don’t overload the wax paper with too many crayon shavings. A thin layer works best for even melting.
Variation
To add more fun to your craft, you can use different templates such as animals, stars, or geometric shapes instead of just leaves. You can also incorporate glitter or even use colored tissue paper for an alternative effect. If you want something a little more permanent, consider using a laminator to seal your designs after cutting them out.
FAQs
1. Can I use other types of paper for this craft?
Yes, you can use parchment paper or even deli paper, but wax paper is the best choice for this project because it melts well and creates a beautiful shine.
2. What if I don’t have crayons?
If you don’t have crayons, colored pencils or oil pastels can be used as alternatives, though the results may vary.
3. What should I do if the melted wax paper curls up?
If the melted wax paper curls, you can place it under a heavy book to flatten it out after it cools. You might also want to try using a little weight on top while ironing.
Creating melted wax paper leaf suncatchers is a simple yet rewarding craft for children and families. It encourages creativity, learning, and quality time spent together. Gather some materials and start your autumn crafting adventure today! Enjoy the beauty these colorful suncatchers bring to your home while celebrating the changes in nature.