

Why make this recipe
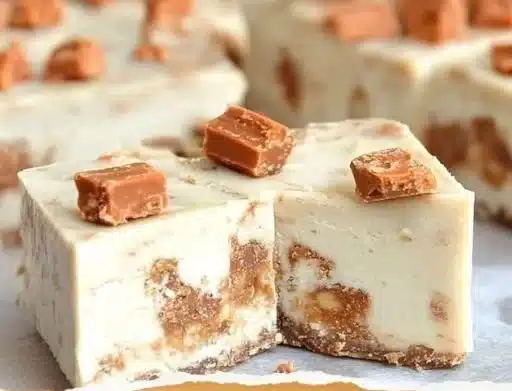
Butterfinger fudge is a delightful treat that pleases both the eyes and the taste buds. If you love the classic crunch and peanut butter flavor of Butterfinger bars, this no-bake fudge is perfect for you. It’s an easy, straightforward recipe that doesn’t require any special baking skills or equipment. With just a few simple steps, you can create a dessert that’s rich, creamy, and utterly satisfying. Whether you’re preparing a batch for a special event or just treating yourself on a cozy evening, this fudge is sure to impress.
How to make Butterfinger Fudge
Making Butterfinger fudge is simpler than you might think. You’ll find that with minimal prep time and no baking required, anyone can whip up this tasty dessert. Below are the detailed ingredients and step-by-step directions to guide you through the process of creating this delicious fudge.
Ingredients
- 2 cups granulated sugar
- ¾ cup heavy whipping cream
- ¾ cup unsalted butter
- Pinch of kosher salt
- 11 ounces white chocolate chips
- 1 jar marshmallow cream (7 ounces)
- 8 snack-sized Butterfinger bars, crushed (reserve ¼ cup for topping)
Directions
-
In a large saucepan, combine the granulated sugar, heavy whipping cream, unsalted butter, and a pinch of kosher salt. Heat over medium heat, stirring frequently, until the mixture comes to a boil. This step is essential for melting the sugar and the butter, allowing all the flavors to combine beautifully.
-
Once the mixture reaches a boil, reduce the heat to medium-low. Allow it to simmer for about 4-5 minutes while stirring constantly. This helps to thicken the mixture, making it rich and creamy.
-
After simmering, add the white chocolate chips to the saucepan. Stir until the chips have fully melted and the mixture is smooth. The heat from the fudge will help melt the chocolate quickly.
-
Fold in the marshmallow cream, mixing until completely combined. The marshmallow cream adds a fluffy texture that enhances the fudge’s overall mouthfeel.
-
Next, mix in the crushed Butterfinger pieces, ensuring they’re evenly distributed throughout the fudge. This will give each bite a delightful crunch.
-
Sprinkle the reserved ¼ cup of Butterfinger pieces on top of the fudge and press them lightly into the surface. This makes for an attractive finish and adds even more of that classic Butterfinger taste.
-
Transfer the mixture to a lined baking dish, smoothing the top with a spatula. Place the dish in the refrigerator and chill for 2-3 hours, or until fully set.
-
Once the fudge is firm, cut it into squares and serve immediately. Enjoy your homemade Butterfinger fudge with family and friends!
Nutriments benefits
While Butterfinger fudge is a treat meant to be enjoyed in moderation, it offers some benefits as well. The use of butter provides essential fats, while cream adds some calcium to your diet. Although not a health food, enjoying fudge in small amounts can satisfy your sweet tooth and provide a quick energy boost.
What to Serve With Butterfinger Fudge
Butterfinger fudge pairs well with various foods and beverages. Here are some delicious ideas:
- Coffee or Tea: A warm cup of coffee or tea complements the rich sweetness of the fudge.
- Vanilla Ice Cream: Serve alongside a scoop of vanilla ice cream for a delightful dessert combination.
- Fresh Fruit: The tartness of fresh berries can balance out the sweetness of the fudge perfectly.
- Milk: A cold glass of milk is the classic choice to enjoy alongside fudge, enhancing the flavors further.
Why You’ll Love This
There are many reasons to love Butterfinger fudge. Firstly, it’s incredibly easy to make, with no baking involved. Secondly, it’s a crowd-pleaser, perfect for parties, holidays, or simply a cozy night in. The blend of creamy, rich fudge with the crunchy, peanut-buttery Butterfinger pieces is addictive. Finally, the recipe is versatile; you can easily tweak ingredient amounts to suit your taste. Whip up a batch, and you’ll understand why it’s such a beloved treat!
How to store Butterfinger Fudge
Storing Butterfinger fudge is quite simple. Here are some tips:
- Keep it Cool: Store the fudge in an airtight container in the refrigerator to maintain its texture and flavor.
- Seal Tightly: Make sure the container is sealed tightly to prevent the fudge from drying out or absorbing other odors from the fridge.
- Shelf Life: Properly stored, Butterfinger fudge can last in the refrigerator for about 1-2 weeks. You can also freeze it for longer storage. Just make sure to wrap it well in plastic wrap before placing it in a freezer-safe container.
Tips and mistakes to avoid
Making Butterfinger fudge is straightforward, but here are some tips to ensure it turns out perfectly:
- Temperature Control: Make sure to watch the temperature when heating your mixture. If it gets too hot, it could burn; if it’s too cool, it may not set properly.
- Chopping Butterfinger Bars: For easier crushing, you may want to chop the Butterfinger bars into pieces before crushing them, especially if they are slightly frozen.
- Mixing: Stirring is crucial when melting the chocolate chips and incorporating the marshmallow cream, so don’t be afraid to take your time with this step.
- Testing for Set: Ensure that the fudge feels firm to the touch after chilling before cutting. If it’s still soft, give it more time in the refrigerator.
Variation
While this Butterfinger fudge recipe is delicious as it is, you can experiment with variations to suit your taste:
- Milk Chocolate: Swap out white chocolate chips for milk chocolate for a different flavor profile.
- Add Nuts: Incorporate chopped peanuts or walnuts for a nutty twist.
- Drizzle: Drizzle melted chocolate (white, milk, or dark) on top for added decoration and flavor.
- Flavors: Consider adding a teaspoon of vanilla extract or a sprinkle of sea salt to enhance the overall flavor.
FAQs
1. Can I use other candy bars instead of Butterfinger?
Absolutely! You can substitute Butterfinger bars with your favorite candy bars like Snickers, Reese’s, or Milky Way. Just ensure they are crushed into smaller pieces for even distribution.
2. How do I know when the fudge is set?
The fudge is set when it feels firm to the touch and does not leave any indentation. You can always give it a bit more time in the fridge if you’re unsure.
3. Can I freeze Butterfinger fudge?
Yes, you can freeze it! Wrap the fudge tightly in plastic wrap and place it in an airtight container before freezing. It can last up to three months in the freezer. Just allow it to thaw in the refrigerator before serving.
By following these easy steps and recommendations, you’ll create a delicious batch of Butterfinger fudge that everyone will love. Enjoy each bite of this tasty treat!
Print
Butterfinger Fudge
- Total Time: 135 minutes
- Yield: 16 servings 1x
- Diet: Vegetarian
Description
An easy, no-bake fudge that combines the rich flavors of cream and butter with the crunch of Butterfinger bars.
Ingredients
- 2 cups granulated sugar
- ¾ cup heavy whipping cream
- ¾ cup unsalted butter
- Pinch of kosher salt
- 11 ounces white chocolate chips
- 1 jar marshmallow cream (7 ounces)
- 8 snack-sized Butterfinger bars, crushed (reserve ¼ cup for topping)
Instructions
- In a large saucepan, combine the granulated sugar, heavy whipping cream, unsalted butter, and a pinch of kosher salt. Heat over medium heat, stirring frequently, until the mixture comes to a boil.
- Reduce the heat to medium-low and allow the mixture to simmer for about 4-5 minutes while stirring constantly.
- Add the white chocolate chips to the saucepan and stir until fully melted and smooth.
- Fold in the marshmallow cream until completely combined.
- Mix in the crushed Butterfinger pieces, ensuring they’re evenly distributed.
- Sprinkle the reserved ¼ cup of Butterfinger pieces on top and press lightly into the surface.
- Transfer the mixture to a lined baking dish and chill in the refrigerator for 2-3 hours or until fully set.
- Cut into squares and serve immediately.
Notes
Store in an airtight container in the refrigerator for 1-2 weeks. Can be frozen for longer storage.
- Prep Time: 15 minutes
- Cook Time: 5 minutes
- Category: Dessert
- Method: No-Bake
- Cuisine: American
Nutrition
- Serving Size: 1 square
- Calories: 200
- Sugar: 20g
- Sodium: 50mg
- Fat: 9g
- Saturated Fat: 5g
- Unsaturated Fat: 4g
- Trans Fat: 0g
- Carbohydrates: 27g
- Fiber: 0g
- Protein: 2g
- Cholesterol: 30mg