
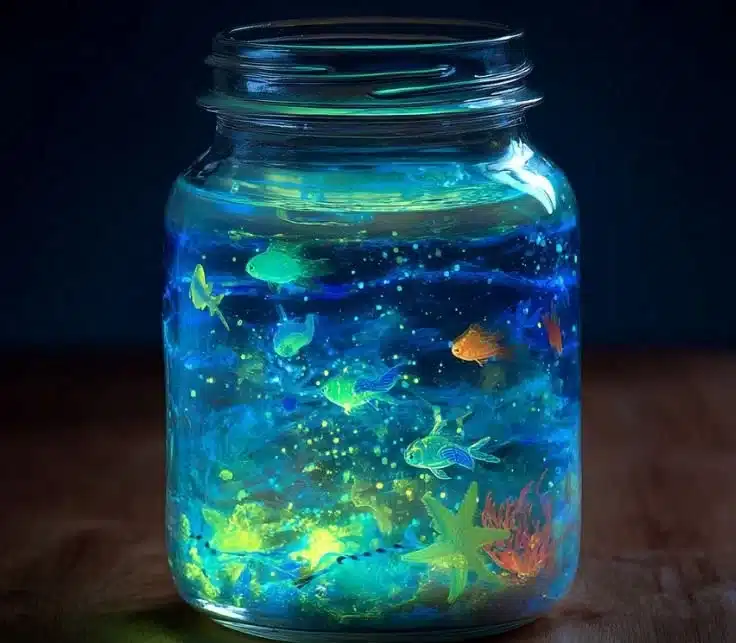


How to make Glow-in-the-Dark Aquarium Jar DIY Craft for Kids & Home Decor
Ingredients:
- 1 clean glass jar with a lid (any size)
- Clear or blue gel food coloring (optional for water color)
- Glow-in-the-dark paint or glowing resin
- Plastic sea creatures (fish, jellyfish, starfish, etc.)
- Water
- Decorative stones or pebbles (for the bottom)
- Glitter (optional for a sparkling effect)
- A small LED light (optional for added glow)
- Craft glue or hot glue gun
- Spoon for stirring
Directions:
-
Prepare Your Jar: Start by cleaning your glass jar thoroughly. Make sure there are no labels or residue left on the jar. Dry it well.
-
Add Decorative Stones: Place a layer of decorative stones or pebbles at the bottom of the jar. This will act as a base for your aquarium and give it a natural look.
-
Mix the Glow-in-the-Dark Paint: In a separate bowl, mix your glow-in-the-dark paint with water according to the instructions on the paint container. If you want to add color to your water, mix in a few drops of clear or blue gel food coloring.
-
Add Water: Carefully pour the glow-in-the-dark mixture into the jar over the stones. Fill the jar until it is almost full, leaving space at the top for the creatures.
-
Insert Sea Creatures: Gently place plastic sea creatures into the jar. You can arrange them however you like; let your creativity shine!
-
Add Glitter (Optional): If you want a bit of sparkle, sprinkle some glitter into the jar. This will enhance the overall look of your aquarium.
-
Seal the Jar: If you have a lid for your jar, secure it on top. This will keep everything inside and maintain the glow effect when your jar isn’t being used.
-
Charge the Glow: Expose your new glow-in-the-dark aquarium to light for a while. It can be natural sunlight or an artificial light source. The longer you charge it, the better the glow will be!
-
Display and Enjoy: Place your glowing aquarium in a dark room or corner to see the magic! You can also use a small LED light (placed outside or under the jar) for an additional glow effect.
Why You’ll Love This Glow-in-the-Dark Aquarium Jar DIY Craft
Creating a glow-in-the-dark aquarium jar is a fantastic way to combine creativity with fun science. Not only does it brighten up any room, but it also provides an exciting and interactive experience for kids. This DIY craft is perfect for a rainy day, ensuring that kids stay entertained while learning about marine life. Plus, the gentle glow at night adds a whimsical touch to home decor, making it a beautiful nightlight.
Nutriments benefits
While this craft doesn’t involve food, it certainly has benefits related to creativity, fine motor skills, and scientific exploration. Engaging in such artistic activities can improve children’s focus, patience, and ability to follow directions. Additionally, it fosters teamwork and communication when done in groups, making it perfect for family bonding or friends’ gatherings.
What to Serve With Glow-in-the-Dark Aquarium Jar DIY Craft
While you might not "serve" anything with this craft, you can pair the experience with a fun ocean-themed snack. Think about serving blue Jell-O cups or ocean-themed cupcakes decorated with fondant sea creatures. This way, your craft time can turn into an entire ocean adventure!
How to store Glow-in-the-Dark Aquarium Jar DIY Craft
To keep your aquariums glowing and looking fresh, store them in a cool, dry place away from direct sunlight when not in use. If you find that the glow fades, simply place it under a light source for a bit to recharge the glow-in-the-dark paint. Ensure the lid is secure to prevent any creatures from escaping!
Tips and mistakes to avoid
-
Don’t Overfill: Leave some space at the top of the jar to avoid spills and mess when adding water and creatures.
-
Use Non-toxic Materials: Make sure that the paint and materials you use are non-toxic, especially if younger children are involved.
-
Mix Paint Well: Ensure that you mix the glow-in-the-dark paint thoroughly with water for an even glow.
-
Test the Glow: Always test the glowing effect in a dark environment to see if it needs more time to charge or more paint.
-
Secure Creatures: Use a strong craft glue to secure any larger creatures if you want to ensure they don’t float to the top.
Variation
-
Color Themes: You can choose different food colorings to create various aquatic themes, like an arctic aquarium with white and blue tones, or a tropical setting with bright colors.
-
Themed Creatures: Diversify the creatures based on themes, such as using only fish, only jellyfish, or even adding little mermaid figurines for fantasy themes.
-
Add Plants: You can also add fake aquatic plants to enhance the beauty and realism of your aquarium.
FAQs
Q1: Can I reuse the jar for another craft?
Yes, you can. Just clean the jar properly to remove any leftover materials or glue to start fresh.
Q2: How long does the glow last?
The duration of the glow can vary based on the paint used and the light intensity during charging. Typically, it can glow for several hours.
Q3: Is this craft suitable for all ages?
Yes, while younger kids may need assistance, this craft can be fun and fulfilling for all age groups. Always supervise younger children when using glue or other crafting materials.
Q4: Can I customize the size of the aquarium?
Absolutely! You can use smaller or larger jars based on your preference. Just adjust the number of materials accordingly.
Q5: Is there a specific type of glow-in-the-dark paint I should use?
Look for non-toxic glow-in-the-dark acrylic paint for the best results. Some craft stores also offer specific products designed for use in water. Always read the labels for safety and best practices.
Creating your own glow-in-the-dark aquarium jar is a fun, simple craft that can brighten any room and inspire creativity in kids. With easy-to-find materials and straightforward instructions, you can enjoy creating beautiful, glowing ocean scenes that will be cherished displays in your home. Happy crafting!
Print
Glow-in-the-Dark Aquarium Jar DIY Craft
- Total Time: 15 minutes
- Yield: 1 aquarium jar 1x
- Diet: N/A
Description
A fun DIY project for kids that creates a glowing aquarium jar using simple materials, perfect for home decor.
Ingredients
- 1 clean glass jar with a lid (any size)
- Clear or blue gel food coloring (optional for water color)
- Glow-in-the-dark paint or glowing resin
- Plastic sea creatures (fish, jellyfish, starfish, etc.)
- Water
- Decorative stones or pebbles (for the bottom)
- Glitter (optional for a sparkling effect)
- A small LED light (optional for added glow)
- Craft glue or hot glue gun
- Spoon for stirring
Instructions
- Prepare Your Jar: Start by cleaning your glass jar thoroughly. Make sure there are no labels or residue left on the jar. Dry it well.
- Add Decorative Stones: Place a layer of decorative stones or pebbles at the bottom of the jar.
- Mix the Glow-in-the-Dark Paint: In a separate bowl, mix your glow-in-the-dark paint with water according to the instructions on the paint container. If using food coloring, mix a few drops in.
- Add Water: Carefully pour the glow-in-the-dark mixture into the jar over the stones.
- Insert Sea Creatures: Gently place plastic sea creatures into the jar as desired.
- Add Glitter (Optional): Sprinkle some glitter into the jar for extra sparkle.
- Seal the Jar: Secure the lid on the jar if available.
- Charge the Glow: Expose the aquarium to light for optimal glowing effect.
- Display and Enjoy: Place your glowing aquarium in a dark space to enjoy its magic.
Notes
Store in a cool, dry place and recharge under light as needed. Use non-toxic materials for safety, especially for children.
- Prep Time: 15 minutes
- Cook Time: 0 minutes
- Category: Craft
- Method: Crafting
- Cuisine: DIY
Nutrition
- Serving Size: 1 jar
- Calories: 0
- Sugar: 0g
- Sodium: 0mg
- Fat: 0g
- Saturated Fat: 0g
- Unsaturated Fat: 0g
- Trans Fat: 0g
- Carbohydrates: 0g
- Fiber: 0g
- Protein: 0g
- Cholesterol: 0mg