
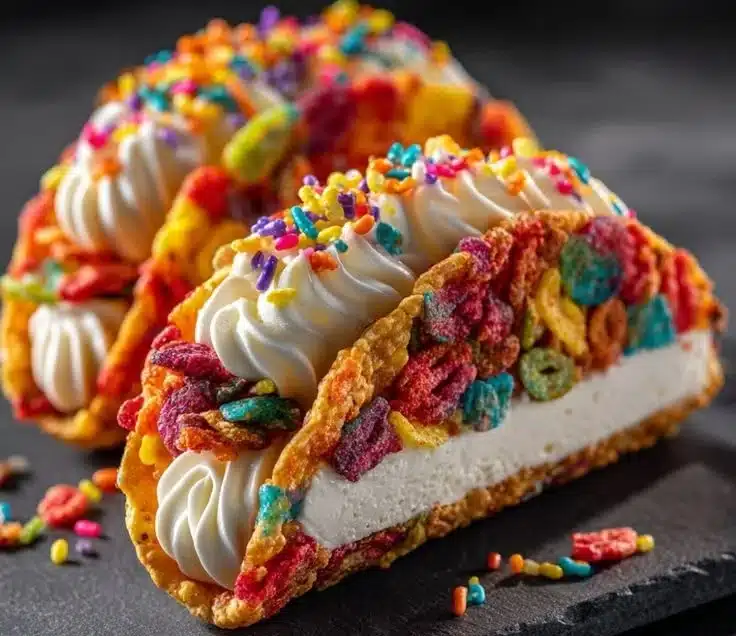

How to make Fruity Pebbles Cheesecake Tacos
Making Fruity Pebbles Cheesecake Tacos is a fun and unique dessert that combines the classic flavors of cheesecake with the playful crunch of Fruity Pebbles. This no-bake treat is perfect for any occasion, whether you’re hosting a gathering or simply treating yourself. Here’s how to make this delightful dessert.
Ingredients
- 8 Stand ‘N Stuff Taco Shells
- 10 oz White Melting Wafers
- 3 cups Fruity Pebbles Cereal (divided)
- 8 oz Cream Cheese (full-fat, softened)
- 1 cup Powdered Sugar
- 1 cup Heavy Whipping Cream (cold)
- 1 tsp Vanilla Extract
- 1/2 cup Fruity Pebbles Cereal (lightly crushed)
Directions
Create the Crispy Taco Shells
-
Prepare the Melted Coating
Start by melting the white melting wafers in a microwave-safe bowl. Heat in short bursts, stirring in between until smooth. -
Dip Taco Shells
Take each Stand ‘N Stuff taco shell and dip the edges into the melted white chocolate. Allow any excess to drip off. -
Coat with Cereal
Immediately roll the coated edges in 2 cups of Fruity Pebbles. This adds a delightful crunch and colorful look. Place the taco shells on a parchment-lined baking sheet to set and harden.
Whip Up the Creamy Cheesecake Filling
-
Beat Cream Cheese and Sugar
In a mixing bowl, add the softened cream cheese and powdered sugar. Use a hand mixer or stand mixer to beat until the mixture is smooth and creamy. -
Add Vanilla and Whipping Cream
Pour in the vanilla extract. Next, slowly add the cold heavy whipping cream. Beat the mixture until it forms stiff peaks. This process gives your cheesecake filling a fluffy texture. -
Fold in Remaining Cereal
Gently fold in the remaining 1 cup of Fruity Pebbles into the cheesecake mixture. Be careful not to crush the cereal too much.
Assemble Your Dessert Tacos
-
Fill Taco Shells
Use a piping bag or a spoon to fill each taco shell with the cheesecake filling. Be generous – don’t be shy about wanting a lot of that creamy goodness! -
Top with Crushed Cereal
Sprinkle the lightly crushed Fruity Pebbles on top of each taco for an extra layer of texture and color. -
Chill and Serve
Place the tacos in the refrigerator for about 30 minutes to firm up the filling. Once they’re chilled, they’re ready to serve!
Why You’ll Love This Fruity Pebbles Cheesecake Tacos
Fruity Pebbles Cheesecake Tacos are not just visually appealing; they also provide a combination of flavors that excite your taste buds. The creamy filling contrasts perfectly with the crunchy taco shell and Fruity Pebbles, making every bite a delightful experience. Plus, since these tacos are no-bake, they are incredibly easy to make! You can whip these up quickly without turning on your oven, making them perfect for hot days or last-minute gatherings.
Nutritional Benefits
These cheesecake tacos provide a fun way to enjoy some classic ingredients with a twist. Here’s a quick look at what you can expect nutritionally:
- Cream Cheese: Offers calcium and phosphorus, essential for healthy bones.
- Fruity Pebbles: These provide a source of vitamins and fiber, along with a burst of playful color to your treat.
- Heavy Whipping Cream: Although high in calories, it adds richness and satisfaction to your dessert.
What to Serve With Fruity Pebbles Cheesecake Tacos
To complement the sweetness and lightness of the tacos, consider serving them with:
- Fresh fruit like strawberries or blueberries.
- A scoop of vanilla or any fruity ice cream.
- A drizzle of chocolate or caramel sauce on the side for dipping.
How to Store Fruity Pebbles Cheesecake Tacos
If you happen to have leftovers (which might be a rare case!), storing them properly is essential to keep them fresh:
-
Refrigerate: Store them in an airtight container in the refrigerator. They can last for up to 2 days, but they are best enjoyed fresh. The cereal may lose some of its crunch over time.
-
Freeze: While not recommended for this recipe due to the texture changes, if you must, tightly wrap any leftovers and freeze. When ready to eat, thaw in the fridge overnight before serving.
Tips and Mistakes to Avoid
- Softened Cream Cheese: Make sure your cream cheese is at room temperature before mixing; this will help achieve a smooth consistency.
- Don’t Overmix: When adding the heavy cream, mix just until you reach stiff peaks. Overmixing can lead to a grainy texture.
- Check Chocolate Coating: Allow the melted chocolate to cool slightly before dipping to avoid it melting the taco shells.
Variation (If Any)
Try changing the cereal for a different flavor! You could substitute Fruity Pebbles with Cocoa Pebbles or even Lucky Charms for a fun twist. Additionally, consider adding a fruit puree or flavored extract to the cheesecake filling for a unique taste accent.
FAQs
1. Can I make this recipe gluten-free?
Yes! Ensure that the taco shells and any added ingredients are certified gluten-free.
2. How can I make these tacos dairy-free?
You can substitute cream cheese with a dairy-free cream cheese option and use coconut cream instead of heavy cream for a dairy-free alternative.
3. What other toppings can I use?
Feel free to add fresh fruit, chocolate chips, sprinkles, or even mini marshmallows for variety and fun!
Fruity Pebbles Cheesecake Tacos are a sweet, colorful, and whimsical addition to any dessert table. They’re easy and enjoyable to make, with endless possibilities for adaptation. So gather your ingredients, and get ready to create this delightful no-bake treat!
Print
Fruity Pebbles Cheesecake Tacos
- Total Time: 45 minutes
- Yield: 4 servings 1x
- Diet: Vegetarian
Description
A fun and unique dessert that combines cheesecake flavors with the playful crunch of Fruity Pebbles in taco form.
Ingredients
- 8 Stand ‘N Stuff Taco Shells
- 10 oz White Melting Wafers
- 3 cups Fruity Pebbles Cereal (divided)
- 8 oz Cream Cheese (full-fat, softened)
- 1 cup Powdered Sugar
- 1 cup Heavy Whipping Cream (cold)
- 1 tsp Vanilla Extract
- 1/2 cup Fruity Pebbles Cereal (lightly crushed)
Instructions
- Start by melting the white melting wafers in a microwave-safe bowl. Heat in short bursts, stirring in between until smooth.
- Take each Stand ‘N Stuff taco shell and dip the edges into the melted white chocolate. Allow any excess to drip off.
- Immediately roll the coated edges in 2 cups of Fruity Pebbles. This adds a delightful crunch and colorful look. Place the taco shells on a parchment-lined baking sheet to set and harden.
- In a mixing bowl, add the softened cream cheese and powdered sugar. Use a hand mixer or stand mixer to beat until the mixture is smooth and creamy.
- Pour in the vanilla extract. Next, slowly add the cold heavy whipping cream. Beat the mixture until it forms stiff peaks.
- Gently fold in the remaining 1 cup of Fruity Pebbles into the cheesecake mixture.
- Use a piping bag or a spoon to fill each taco shell with the cheesecake filling. Be generous!
- Sprinkle the lightly crushed Fruity Pebbles on top of each taco for an extra layer of texture and color.
- Place the tacos in the refrigerator for about 30 minutes to firm up the filling.
Notes
Make sure your cream cheese is at room temperature before mixing for a smooth consistency.
- Prep Time: 15 minutes
- Cook Time: 0 minutes
- Category: Dessert
- Method: No-Bake
- Cuisine: American
Nutrition
- Serving Size: 1 taco
- Calories: 350
- Sugar: 20g
- Sodium: 250mg
- Fat: 22g
- Saturated Fat: 12g
- Unsaturated Fat: 8g
- Trans Fat: 0g
- Carbohydrates: 40g
- Fiber: 1g
- Protein: 5g
- Cholesterol: 40mg