

How to make Crayon Shaving Stained Glass Shapes
Ingredients:
- Crayons (various colors)
- Parchment paper or wax paper
- A pencil sharpener
- An iron (with adult supervision)
- Scissors
- Cookie cutters or templates (for different shapes)
- Optional: black construction paper or glue (for frames)
Directions:
-
Prep the Crayons: Gather your crayons and start by peeling off the wrapper. Make sure to do this carefully so you don’t break the crayons.
-
Shave the Crayons: Use a pencil sharpener to shave the crayons into small flakes. You can use different colors and create a mixture, or stick to a few shades that you enjoy.
-
Create the Colorful Layering: Place a piece of parchment or wax paper on your work surface. Spread the crayon shavings evenly on one half of the paper, creating a colorful layer.
-
Seal the Paper: Fold the other half of the parchment paper over the crayon shavings. This will protect the shavings from direct heat.
-
Iron the Shavings: With adult supervision, heat up the iron on a low setting. Carefully press the iron down on the folded parchment paper, moving it gently over the top. The heat will melt the crayon shavings and fuse them together, creating a beautiful stained glass effect. Lift the iron after a few seconds and check if the shavings have melted. Repeat until you have a smooth surface.
-
Cut Out Shapes: Once the melted crayon layer cools down, unfold the parchment/wax paper. Use cookie cutters or templates to cut out fun shapes from the colorful crayon design.
-
Display Your Art: You can hang these shapes in windows for a lovely stained glass effect. If desired, you can clip them onto black construction paper or glue them to create frames for added contrast.
Why You’ll Love This Crayon Shaving Stained Glass Shapes
Creating crayon shaving stained glass shapes is not just a fun craft; it’s a fantastic way to spend quality time with kids. This project encourages creativity, improves fine motor skills, and provides a vibrant decoration that brightens up any room. Watching the transformation from crayon shavings to colorful light-catching shapes is truly magical for kids and adults alike.
Nutriment benefits
While this craft doesn’t have traditional nutritional benefits like food does, it provides several developmental advantages. Crafting improves hand-eye coordination, boosts creativity, and enhances concentration. These skills are essential for young children as they grow and learn.
What to Serve With Crayon Shaving Stained Glass Shapes
These colorful creations are perfect for any art-themed day or a quiet afternoon at home. Serve them alongside other kids’ crafts or activities like making friendship bracelets, painting rocks, or creating other types of DIY decor. You could even tie this craft into a reading session about colors or art.
How to Store Crayon Shaving Stained Glass Shapes
If you have leftover shapes or want to keep your creations safe, store them in a flat container lined with newspaper or tissue paper. Avoid stacking them directly on top of each other to prevent scratches or damage to the art. For long-term storage, consider hanging them in a window or framing them to display in your home.
Tips and mistakes to avoid
- Tip: When using the iron, make sure to set it to a low temperature to avoid burning the crayons or paper.
- Mistake to avoid: Don’t overheat the crayon shavings. If they burn, they may discolor and give off an unpleasant smell.
- Tip: Try using different types of crayons, such as glitter crayons or neon ones, for more vibrant colors.
- Mistake to avoid: Ensure that children are supervised while using the sharpener and iron to prevent accidents.
Variation
If you want to add more flair to your stained glass shapes, consider these fun variations:
- Use a variety of paper types, like colored tissue paper or scrapbook paper, instead of only wax or parchment paper.
- Create layered effects by stacking multiple colors of crayon shavings before melting them.
- Experiment with different shapes or even combine shapes to make one unique piece.
FAQs
Q: Can I use regular paper instead of wax paper?
A: It’s not recommended to use regular paper, as it may stick to the melted crayon and ruin your work. Stick to wax or parchment paper for the best results.
Q: How do I clean my iron after making these shapes?
A: If crayon wax gets on your iron, let it cool down first. Then, use a cloth or paper towel to gently wipe the surface. You can also use a bit of baking soda mixed with water to remove any stubborn spots.
Q: Is this craft safe for younger children?
A: Yes, but always ensure adult supervision, especially during the shaving and ironing steps. Younger children can help with gathering supplies and layering the shavings, making it a family-friendly project.
Creating crayon shaving stained glass shapes is a delightful, vibrant, and engaging activity that encourages creativity. It’s a splendid way for kids to explore colors and shapes while enjoying the rewarding experience of creating their own art!
Print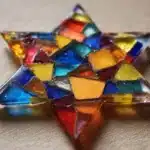
Crayon Shaving Stained Glass Shapes
- Total Time: 15 minutes
- Yield: Various shapes
- Diet: N/A
Description
A fun and colorful craft that transforms crayon shavings into beautiful stained glass shapes for decoration.
Ingredients
- Crayons (various colors)
- Parchment paper or wax paper
- A pencil sharpener
- An iron (with adult supervision)
- Scissors
- Cookie cutters or templates (for different shapes)
- Optional: black construction paper or glue (for frames)
Instructions
- Gather your crayons and carefully peel off the wrappers.
- Use a pencil sharpener to shave the crayons into small flakes.
- Place a piece of parchment or wax paper on your work surface and spread the crayon shavings evenly on one half of the paper.
- Fold the other half of the parchment paper over the crayon shavings to protect them from direct heat.
- Heat up the iron on a low setting and press it down gently on the folded parchment paper, moving it carefully until the shavings fuse together.
- Once cooled, unfold the paper and use cookie cutters or templates to cut out shapes from the colorful design.
- Display the shapes in windows or frame them with black construction paper or glue for added contrast.
Notes
Ensure adult supervision when using sharp tools and the iron.
- Prep Time: 10 minutes
- Cook Time: 5 minutes
- Category: Craft
- Method: Crafting
- Cuisine: N/A
Nutrition
- Serving Size: 1 shape
- Calories: 0
- Sugar: 0g
- Sodium: 0mg
- Fat: 0g
- Saturated Fat: 0g
- Unsaturated Fat: 0g
- Trans Fat: 0g
- Carbohydrates: 0g
- Fiber: 0g
- Protein: 0g
- Cholesterol: 0mg