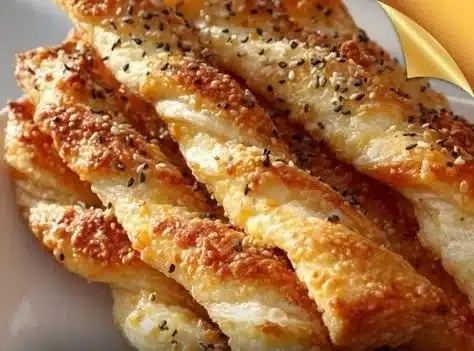

How to make Cheese Straws
Cheese straws are a delightful treat that combines the richness of cheese with a satisfying crunch. They make perfect snacks for any occasion, be it a party or a cozy night in. Here’s how to whip up this tasty and simple recipe at home.
Ingredients:
- 1 cup shredded cheddar cheese
- 1/2 cup unsalted butter, softened
- 1 cup all-purpose flour
- 1/4 teaspoon salt
- 1/4 teaspoon paprika
- 1 tablespoon poppy seeds
- 1-2 tablespoons cold water
Directions:
- Preheat the oven to 375°F (190°C).
- In a mixing bowl, combine the shredded cheese and softened butter until well blended.
- Add the flour, salt, paprika, and poppy seeds. Mix until the dough forms.
- Add cold water as needed to bring the dough together.
- Roll the dough out on a floured surface to about 1/8 inch thick.
- Cut into thin strips or desired shapes.
- Place on a baking sheet lined with parchment paper.
- Bake for 12-15 minutes or until golden and crispy.
- Allow to cool slightly before serving.
Why You’ll Love This Cheese Straws
Cheese straws are not only delicious but also versatile. Their crunchy texture and cheesy flavor make them a hit with both kids and adults. Whether enjoyed on their own or paired with dips, they bring joy to any snacking situation. Additionally, they can be made in large batches, ensuring you have enough to share or enjoy throughout the week.
Nutritional Benefits
Cheese straws contain cheese, which is a good source of protein and calcium. The butter adds rich flavor, while the poppy seeds offer a bit of crunch and nutritional value. Though cheese straws are an indulgent snack, you can make them lighter by adjusting some ingredients or serving them in moderation. Here’s a brief breakdown of their nutritional aspects:
| Nutrient | Benefits |
|—————-|———————————–|
| Protein | Builds and repairs tissues |
| Calcium | Supports bone health |
| Healthy Fats | Provides energy and supports cell function |
| Fiber (from flour) | Aids in digestion |
Enjoy your cheese straws without guilt when you appreciate the benefits they can bring to your diet!
What to Serve With Cheese Straws
These tasty cheese straws can be enjoyed on their own, but there are many ways to elevate your snack game. Here are a few ideas to serve alongside your cheese straws:
- Dips: Combine them with creamy dips like ranch, guacamole, or salsa.
- Salads: Pair them with a light salad for added crunch and flavor.
- Soups: They make a wonderful side for soups, adding a crunchy contrast to hot bowls.
- Cheese Boards: Include them as part of a cheese board with various cheeses and fruits.
Feel free to mix and match to find your favorite pairing!
How to Store Cheese Straws
Storing cheese straws properly can maintain their delicious crunch. Here are simple guidelines:
- Room Temperature: Store in an airtight container for up to 3 days. Keep them in a cool, dry place away from sunlight.
- Refrigerator: If you want to keep them longer, you can store them in the fridge for up to one week. Be sure they are in an airtight container.
- Freezer: For longer storage, cheese straws can be frozen. Place them in a single layer on a baking sheet to freeze before transferring them to a freezer bag for up to 3 months. When you want to enjoy them, bake from frozen, adding a few extra minutes to the cooking time.
Tips and Mistakes to Avoid
Making cheese straws may seem simple, but a few tips can improve your results:
- Butter Temperature: Make sure your butter is softened but not melted. It should be at a room temperature for better mixing.
- Flour Measurement: Use the spoon-and-level technique to measure your flour to avoid adding too much, which can make your straws tough.
- Don’t Overmix: Once you combine the ingredients, mix until just combined. Overmixing can lead to dense straws.
- Size Matters: Cut the straws into uniform sizes for even baking.
- Cooling Time: Allow cheese straws to cool slightly after baking. They crisp up as they cool.
By keeping these tips in mind, you’ll create perfect cheese straws every time!
Variations
While the classic cheese straw recipe is delicious, feel free to experiment with different flavors and add-ins:
- Herbs and Spices: Incorporate fresh herbs like rosemary or thyme for an aromatic twist, or use other spices like garlic powder for added flavor.
- Cheese Choices: Swap cheddar cheese for other varieties such as pepper jack for a spicy kick or gouda for a rich flavor profile.
- Add Nuts: For an extra crunch, consider folding in some finely chopped nuts like pecans or walnuts.
- Vegetable Additions: Grate a little zucchini or carrot into the dough for added moisture and nutrients.
Be creative and tailor your cheese straws to suit your taste!
FAQs
-
Can I make cheese straws ahead of time?
Yes, you can prepare the dough, shape it, and freeze it. Bake them fresh whenever you want! -
Can I use a different type of cheese?
Absolutely! Feel free to experiment with your favorite cheeses for different flavors. -
How do I know when my cheese straws are done baking?
They should be golden brown and crispy. Keep an eye on them, as they can quickly go from perfectly baked to burnt.
Cooking cheese straws is a simple process, and with the right ingredients and techniques, you’ll create a delicious snack. Enjoy your baking and savor every crunchy bite!