
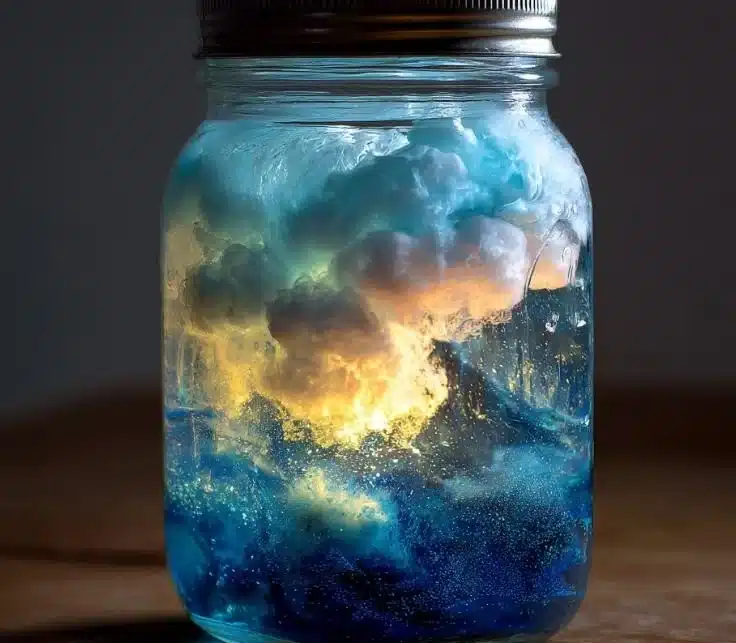


How to make DIY Storm in a Jar
Creating a storm in a jar is a fun and easy science-inspired craft project that both kids and adults can enjoy. This project combines simple ingredients to produce a stunning visual effect that mimics a storm, making it a great educational experience. Let’s dive into how to create this awe-inspiring craft.
Ingredients:
- A clean glass jar with a lid
- Water (approximately 1 cup)
- Vegetable oil (approximately 1/2 cup)
- Blue food coloring
- Alka-Seltzer tablets (or similar effervescent tablets)
- Glitter (optional)
- Small piece of wax paper
Directions:
-
Prepare Your Jar: Take a clean glass jar and ensure it’s dry. The lid should be with it, as you will need it later on.
-
Combine Water and Oil: Pour the water into the jar until it’s about halfway full. Carefully add the vegetable oil. You’ll see that the oil floats on top of the water because it’s less dense.
-
Add Color: Add a few drops of blue food coloring to the jar. This represents water in your storm. Watch as the color drops through the oil and mixes with the water.
-
Create the Storm Effects: If you’d like to make it extra pretty, add a pinch of glitter. This will create a sparkling effect which can resemble rain.
-
Add the Alka-Seltzer: Break an Alka-Seltzer tablet into smaller pieces. Drop a piece into the jar and watch the magic happen! The tablet will react with the water, creating bubbles that rise through the oil, creating a storm-like effect.
-
Replace the Lid: If you want to keep the storm effect contained, place the lid on the jar. Otherwise, you can just let the storm rage on!
-
Repeat: You can drop more pieces of Alka-Seltzer for continuous storm action!
Why You’ll Love This DIY Storm in a Jar
Making a DIY Storm in a Jar is not just a captivating craft; it is also an enjoyable scientific demonstration. Kids will be fascinated by the bubble effects, and it’s a simple way to introduce them to basic scientific principles like density, reactions, and the creation of gases.
Nutritional Benefits
While this project isn’t edible, it still fosters creativity, curiosity, and fun learning experiences. There is no nutritional input here, but indirectly, engaging in these types of activities promotes mental well-being and cognitive development in children.
What to Serve With DIY Storm in a Jar
Serving ideas really apply here, as this project stands alone as a craft. However, you can complement the experience with a science-themed snack break afterward, which might include:
- Cloud Chocolate Pops: White chocolate pops representing clouds.
- Gummy Bear Rain: A handful of gummy bears resembling colorful raindrops.
- Puffy Popcorn: Showcasing fluffy popcorn to resemble clouds.
How to Store DIY Storm in a Jar
If you want to keep your storm in a jar for later, ensure that you tightly seal the lid. Store it in a cool place away from direct sunlight to prevent the water and food coloring from fading. You can also keep the jar in the fridge if you want the reaction to last longer.
Tips and Mistakes to Avoid
- Don’t Overfill: Make sure not to fill the jar too much. Leave plenty of space for the oil and bubbles to rise and create movement.
- Quality Ingredients: Use fresh Alka-Seltzer tablets. Dull or expired tablets may not create the expected effect.
- Sealing the Lid: Ensure the lid is tight. This prevents spills while also keeping the jar’s visual effects intact for display.
Variation
For a twist on the classic storm in a jar, consider trying the following variations:
- Colorful Storms: Use different food colorings such as red, green, or yellow to create colorful storm effects.
- Layered Jar: Try using more than one layer of colored water, similar to a lava lamp effect, for more complexity.
- Essential Oils: Add a few drops of essential oil for fragrance. This adds another sensory dimension to your storm.
FAQs
Q: Can I use any kind of oil?
A: Yes, you can use any type of cooking oil. Olive oil, canola oil, or even coconut oil can work, but they may affect the look of the project.
Q: Can I recycle the materials after use?
A: Yes, if you choose to dispose of your storm in a jar, you can pour the liquid down the sink and recycle the jar.
Q: How long will the storm in a jar last?
A: The visual effects can last a while if sealed properly. However, the reaction will eventually settle. You can refresh it by adding more Alka-Seltzer as needed.
The DIY Storm in a Jar is a delightful amalgamation of scientific principles and craft. Not only does it allow creativity to flourish, but it also provides an excellent opportunity for hands-on learning!
Print
DIY Storm in a Jar
- Total Time: 10 minutes
- Yield: 1 jar
- Diet: N/A
Description
A fun and educational craft project that mimics a storm using simple ingredients.
Ingredients
- A clean glass jar with a lid
- Water (approximately 1 cup)
- Vegetable oil (approximately 1/2 cup)
- Blue food coloring
- Alka-Seltzer tablets (or similar effervescent tablets)
- Glitter (optional)
- Small piece of wax paper
Instructions
- Prepare Your Jar: Ensure the glass jar is clean and dry.
- Combine Water and Oil: Fill the jar halfway with water, then carefully add vegetable oil on top.
- Add Color: Add a few drops of blue food coloring to the jar.
- Create the Storm Effects: Optionally add glitter for a sparkling effect.
- Add the Alka-Seltzer: Break an Alka-Seltzer tablet and drop a piece into the jar.
- Replace the Lid: Place the lid on if you want to contain the storm.
- Repeat: Add more Alka-Seltzer pieces as desired for continuous storm action.
Notes
Make sure not to overfill the jar, and use fresh Alka-Seltzer tablets for best results.
- Prep Time: 10 minutes
- Cook Time: 0 minutes
- Category: Craft
- Method: Crafting
- Cuisine: Science
Nutrition
- Serving Size: 1 jar
- Calories: 0
- Sugar: 0g
- Sodium: 0mg
- Fat: 0g
- Saturated Fat: 0g
- Unsaturated Fat: 0g
- Trans Fat: 0g
- Carbohydrates: 0g
- Fiber: 0g
- Protein: 0g
- Cholesterol: 0mg