
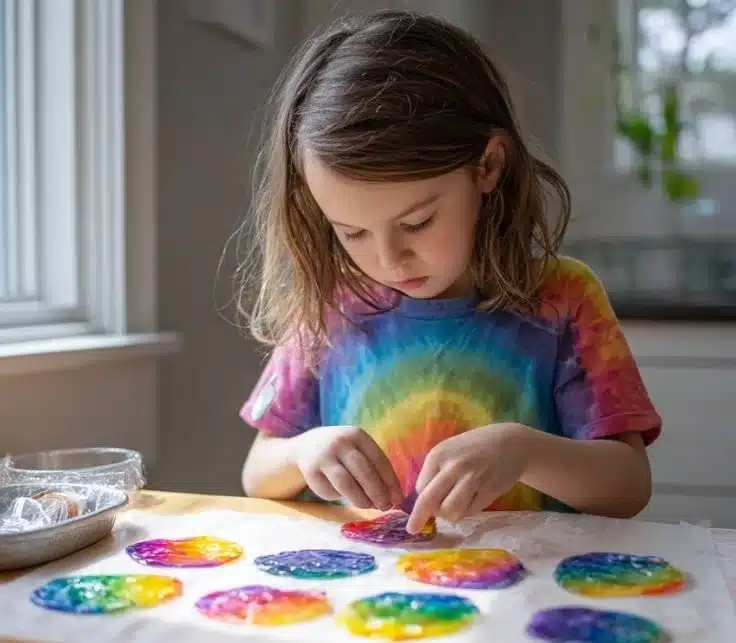

How to make Melted Rainbow Crayon Suncatchers
Creating beautiful suncatchers using melted crayons is an easy and fun project for kids and adults alike. Not only does it brighten up your windows, but it also allows for a burst of creativity. Here’s how to make your very own melted rainbow crayon suncatchers!
Ingredients:
- Crayons (broken or whole, a variety of colors)
- Parchment paper
- Metal baking sheets or microwave-safe containers
- Cookie cutter (optional)
- Scissors
- A utility knife or a sharp knife (for adult supervision)
- Clear adhesive or string for hanging (if desired)
Directions:
-
Prepare the Crayons: First, remove the paper from the crayons. This can usually be done with your fingers or with a utility knife. Make sure to be careful while doing this.
-
Preheat Oven: If you are using the oven method, preheat your oven to 200°F (about 93°C).
-
Break Crayons: Break the crayons into small pieces. You can use a hammer or your hands. Aim for small chunks, about the size of a dime.
-
Arrange Crayon Pieces: Take your metal baking sheets or microwave-safe containers and arrange the crayon pieces in a thin layer. You can use a cookie cutter to create shapes if you want.
-
Melt Crayons:
- Oven Method: Place the baking sheet in the preheated oven and let the crayons melt for about 10-15 minutes. Keep an eye on it to make sure they don’t over melt.
- Microwave Method: If you prefer the microwave, place the crayon pieces in the microwave for about 2-5 minutes, checking every minute until melted.
-
Cool and Cut: Once melted, remove the baking sheet from the oven or microwave and let it cool completely. This may take about 15-30 minutes. Once cool, you can cut or peel the suncatcher out of the baking sheet.
-
Create a Hanger: If you want to hang your suncatcher, use clear adhesive or string to attach it to a window.
-
Display: Find a sunny window and hang your melted rainbow crayon suncatcher for a beautiful display of color!
Why You’ll Love This Melted Rainbow Crayon Suncatcher
Melted rainbow crayon suncatchers are not only a fun craft project, but they also add vibrant colors to your home decor. They are perfect for sunny days, as they catch the light and create stunning rainbows on your walls. The process is easy to follow and gives kids a chance to express their creativity without the need for expensive materials. Plus, you can recycle old crayons you may have lying around!
Nutriments benefits
While melted rainbow crayon suncatchers are not edible, they are made with crayons that are non-toxic. This makes them safe for children to use and enjoy in creative projects. Instead of being wasteful, you turn broken crayons into something beautiful and unique. It’s a great way to teach kids the value of recycling and crafting.
What to Serve With Melted Rainbow Crayon Suncatchers
While melted rainbow crayon suncatchers are more of a decorative project, they often pair well with other fun crafting activities. Try making colorful paper flowers, painted rocks, or DIY greeting cards. These activities encourage creativity and can be a fun afternoon session with friends or family.
How to store Melted Rainbow Crayon Suncatchers
When it comes to storing your melted rainbow crayon suncatchers, it’s best to keep them out of direct sunlight to avoid any melting or warping. Try using a soft cloth to wrap them carefully and place them in a drawer or box. If you have multiple suncatchers, stack them with a piece of parchment paper between each one to prevent scratching.
Tips and mistakes to avoid
- Don’t Overheat: Make sure to monitor the process closely while the crayons are melting. Overheating can create a mess and make the crayon unusable.
- Use Non-Stick Surfaces: Parchment paper or silicone baking mats work well to prevent the melted crayons from sticking and make cleanup easier.
- Safety First: Always supervise children when using knives or working near hot surfaces.
- Experiment with Colors: Feel free to mix and match colors or create solid color suncatchers. The possibilities are endless!
Variation
- Shape Options: Instead of traditional shapes, you can use seasonal cookie cutters (like stars for Christmas or hearts for Valentine’s Day) to create themed suncatchers.
- Add Glitter: Add a sprinkle of glitter or confetti before melting for an extra sparkle effect.
- Two-Layer Suncatchers: Create layered sun catchers by pouring different colors, letting them cool slightly, and then adding another layer on top.
FAQs
-
Can I use any type of crayon?
- Yes! You can use any brand of crayon. Just make sure they are non-toxic.
-
How long does it take for the suncatcher to cool?
- It typically takes about 15-30 minutes to cool completely, depending on thickness.
-
Can I use my suncatcher outside?
- It’s best to keep them indoors or in a shady spot outside as the heat may cause them to melt or warp.
With this guide, making melted rainbow crayon suncatchers will be a breeze! Gather your materials and let your creativity shine as you decorate your home with these colorful and delightful crafts.
Print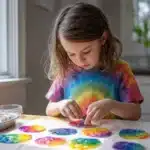
Melted Rainbow Crayon Suncatchers
- Total Time: 30 minutes
- Yield: 1 suncatcher
- Diet: N/A
Description
Create beautiful suncatchers using melted crayons for a vibrant burst of color that brightens your windows.
Ingredients
- Crayons (broken or whole, a variety of colors)
- Parchment paper
- Metal baking sheets or microwave-safe containers
- Cookie cutter (optional)
- Scissors
- A utility knife or a sharp knife (for adult supervision)
- Clear adhesive or string for hanging (if desired)
Instructions
- Prepare the Crayons: Remove the paper from the crayons carefully.
- Preheat Oven: Preheat your oven to 200°F (about 93°C).
- Break Crayons: Break the crayons into small pieces, about the size of a dime.
- Arrange Crayon Pieces: Arrange the crayon pieces in a thin layer on baking sheets or containers.
- Melt Crayons:
- Oven Method: Melt in the oven for 10-15 minutes.
- Microwave Method: Melt in the microwave for 2-5 minutes, checking every minute.
- Cool and Cut: Allow to cool completely for about 15-30 minutes, then cut or peel out of the baking sheets.
- Create a Hanger: Use clear adhesive or string to attach it for hanging.
- Display: Hang your suncatcher in a sunny window to enjoy the colors.
Notes
Don’t overheat the crayons and use non-stick surfaces for easier cleanup. Always supervise children near knives or hot surfaces.
- Prep Time: 15 minutes
- Cook Time: 15 minutes
- Category: Craft
- Method: Melting
- Cuisine: N/A
Nutrition
- Serving Size: 1 suncatcher
- Calories: 0
- Sugar: 0g
- Sodium: 0mg
- Fat: 0g
- Saturated Fat: 0g
- Unsaturated Fat: 0g
- Trans Fat: 0g
- Carbohydrates: 0g
- Fiber: 0g
- Protein: 0g
- Cholesterol: 0mg