
Painting Ice Experiment: Fun & Colorful Science Art for Kids
How to make Painting Ice Experiment
Ingredients:
- A few ice cubes
- Food coloring (various colors)
- Small containers or cups
- Water
- A baking tray or large dish
- Paintbrushes (optional)
- Paper or butcher paper (optional)
Directions:
-
Prepare the Ice: Fill an ice tray with water and freeze it until solid. This usually takes several hours, so it’s best to start this part a day ahead.
-
Set Up Your Work Area: Take out the ice cubes and place them in a baking tray or large dish. This will catch any melting ice and make cleanup easier.
-
Mix Your Colors: In small containers or cups, mix a few drops of food coloring with water. You can create different concentrations of dye by varying the amounts of food coloring you use.
-
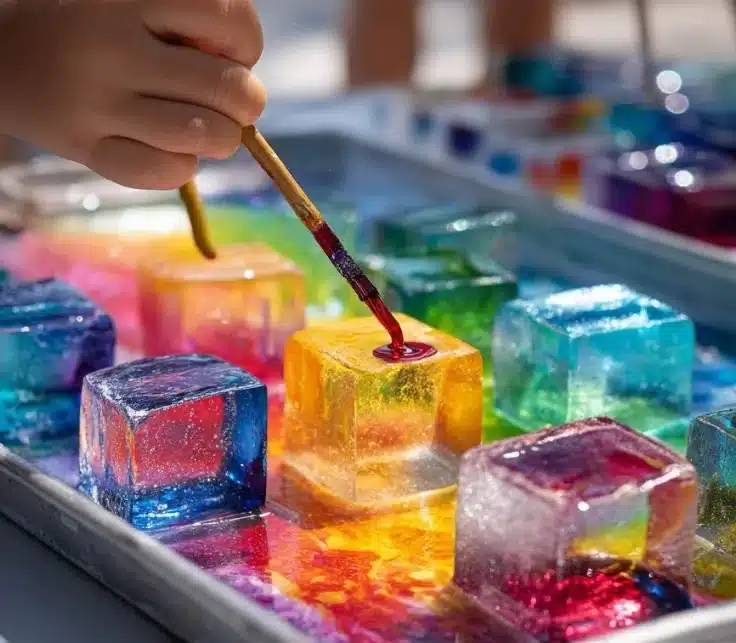
Start Painting: With a paintbrush, dip it into your colored water and splash or paint it onto the ice cubes. If you don’t have brushes, you can pour or drop the colored water directly onto the ice.
-
Observe the Changes: Watch how the colors spread and mix on the ice! This is where the fun begins. You can see the colors tint the ice and even create beautiful patterns as the ice begins to melt.
-
Optional Paper Art: If you want to make some vibrant art, you can also place paper or butcher paper on top of the painted ice. The color will transfer onto the paper as it melts, creating unique designs.
-
Let It Melt: Eventually, all the ice will melt, and you will be left with colorful puddles. Feel free to explore how the colors blend together during this process.
Why You’ll Love This Painting Ice Experiment
The Painting Ice Experiment is not just a fun activity but also a wonderful learning experience. This experiment offers a creative way for children to explore concepts like color mixing, the effect of temperature on matter, and even a bit of art. Watching the colors spread and blend in real time is enchanting for kids and can spark their curiosity about science and the natural world around them.
Nutriments benefits
While this experiment does not involve food, it does engage kids in healthy creative play. Art encourages fine motor skills, enhances problem-solving abilities, and boosts understanding of colors and textures. Providing a hands-on approach helps children learn better, and this colorful activity is a fantastic way to engage their minds.
What to Serve With Painting Ice Experiment
As this is a fun and engaging art activity, it might be perfect to pair it with some delicious snacks for the kids after they finish painting. Consider serving up some colorful fruit skewers made with strawberries, blueberries, and kiwi. You could also offer popsicles or ice water with slices of fresh fruits.
How to store Painting Ice Experiment
If you have leftover ice cubes from your experiment, you can simply store them in the freezer in an airtight container. This way, you can reuse them for future painting or even as refreshing ice for drinks. Just keep in mind that once the ice cubes are painted, they won’t store well and should be used right away for maximum fun.
Tips and mistakes to avoid
-
Choose the Right Containers: Use small containers while mixing colors and avoid deep ones, as it makes it harder for kids to dip their brushes.
-
Be Mindful of Cleanup: Cover the workspace with old newspapers or plastic sheets to avoid stains from the food coloring.
-
Use Enough Color: Don’t be shy with food coloring! The more vibrant your colors, the more fun the experiment will be.
-
Supervise Young Children: If you have young kids, make sure you supervise them during this activity, especially when handling colored water.
-
Avoid Thin Ice: Make sure to allow enough time for the ice to freeze completely; thin ice cubes will melt faster, leading to less painting time.
Variation
If you’d like to change things up a bit, try using different types of paper to see how the colors transfer. For example, watercolor paper will absorb the colors differently than regular printer paper. You could also experiment with different types of food coloring, such as gel versus liquid, to see how they behave on ice. Another fun variation would be to freeze the colored water into different shapes, like stars or hearts, to create themed art.
FAQs
-
Can I use other colors besides food coloring?
Yes! You can use natural colorants like beet juice or turmeric if you prefer a more natural approach to coloring. -
Is this activity safe for kids?
Absolutely! The ingredients used are non-toxic. However, supervise younger kids, especially when handling colored liquids. -
Can I do this activity outside?
Yes! Doing this outside is a great idea, as it allows for easy cleanup, and kids can enjoy the fresh air while engaging in creative play. -
How long does the ice take to melt?
The time it takes for the ice to melt will depend on the temperature and the size of the cubes. On a warm day, you may see it happen quickly while indoors might take a little longer. -
What if I don’t have paintbrushes?
You can use your hands to drop the colored water onto the ice, or use sponge pieces or even pipettes for a fun method of color application. Just make sure to wear old clothes or aprons as it may get messy!
This Painting Ice Experiment is a delightful way to combine art and science, and it promises fun and laughter while learning at the same time. Get ready to immerse yourself in colors and creativity!
Print
Painting Ice Experiment
- Total Time: 60 minutes
- Yield: 1 fun experiment
- Diet: N/A
Description
A fun and colorful science art activity for kids that combines painting and melting ice.
Ingredients
- A few ice cubes
- Food coloring (various colors)
- Small containers or cups
- Water
- A baking tray or large dish
- Paintbrushes (optional)
- Paper or butcher paper (optional)
Instructions
- Prepare the Ice: Fill an ice tray with water and freeze it until solid.
- Set Up Your Work Area: Place the ice cubes in a baking tray to catch melting ice.
- Mix Your Colors: In small containers, mix food coloring with water.
- Start Painting: Use a paintbrush or pour colored water directly onto the ice cubes.
- Observe the Changes: Watch how the colors spread and mix on the ice.
- Optional Paper Art: Place paper on top of the painted ice to transfer colors as it melts.
- Let It Melt: Explore how the colors blend together as the ice melts.
Notes
Cover the workspace with newspapers to avoid stains. Supervise young children during the activity.
- Prep Time: 60 minutes
- Cook Time: 0 minutes
- Category: Art & Crafts
- Method: Creative Play
- Cuisine: N/A
Nutrition
- Serving Size: 1 child
- Calories: 0
- Sugar: 0g
- Sodium: 0mg
- Fat: 0g
- Saturated Fat: 0g
- Unsaturated Fat: 0g
- Trans Fat: 0g
- Carbohydrates: 0g
- Fiber: 0g
- Protein: 0g
- Cholesterol: 0mg