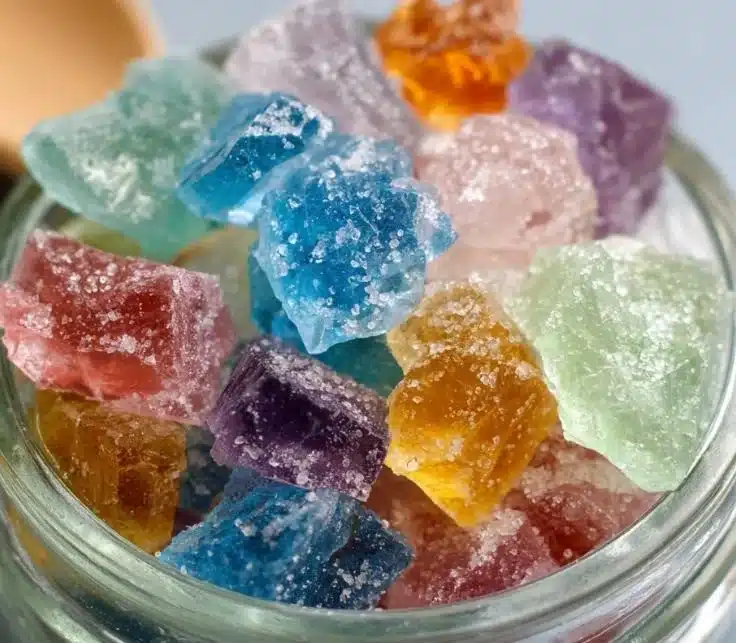

How to make Edible Crystal Rocks
Creating edible crystal rocks is a fun and simple kitchen project that brings out the scientist in everyone. It’s not just a treat for your taste buds; it’s also a fantastic activity for kids and adults alike. Watching the sugar crystals grow can be a fascinating experience, and the end result is a delicious candy that looks like colorful gems. With just a few simple ingredients and a little bit of patience, you can create these sugary delights at home.
Ingredients :
- 2 cups sugar
- 1 cup water
- 1/4 cup corn syrup
- Food coloring
- Wooden skewers
- Jars
Directions :
-
Combine Ingredients: In a saucepan, mix the sugar, water, and corn syrup together. Place it over medium heat and stir it until the sugar completely dissolves. This step is crucial as it ensures that your crystals grow uniformly.
-
Cool the Mixture: Once the sugar dissolves, remove the saucepan from the heat and let it cool for a few minutes. This cooling process helps to prevent the crystals from forming too quickly.
-
Color Your Syrup: Divide the cooled mixture into separate containers. Add a few drops of food coloring to each container for vibrant crystal colors. The amount of food coloring can be adjusted based on how intense you want the colors to appear.
-
Prepare Jars: Carefully pour the colored syrup into jars. Place the wooden skewers into the jars, making sure they are submerged in the syrup. It’s great to have three or four skewers in each jar to create multiple crystal rocks at once!
-
Allow Crystals to Form: Set the jars in a cool, undisturbed place for about 7 days. During this time, the sugar will begin to crystallize on the skewers, forming beautiful, colorful rocks.
-
Enjoy Your Creation: After waiting a week, carefully remove the skewers from the jars. Your edible crystal rocks are ready to eat! Enjoy them as a sweet treat or use them as a fun decoration for cakes and desserts.
Why You’ll Love This Edible Crystal Rock Recipe
There are many reasons to love making edible crystal rocks. Firstly, they are visually stunning. The array of colors can brighten up any dessert table or party spread. Also, they are deliciously sweet, making them a fun candy to enjoy or share with friends.
Making these crystal rocks is also an educational project. Kids can learn about the science of crystallization while engaging in hands-on experimentation. This recipe combines cooking with chemistry, making it a perfect activity for family gatherings or school projects.
Furthermore, they are customizable. You can experiment with different food coloring combinations to create unique shades or even mix flavors if you decide to use flavored syrups. The possibilities are endless!
Nutritional Benefits
While edible crystal rocks are primarily sugar, they do offer some unique benefits. For one, they can be a fun way to satisfy your sweet tooth without the additives found in many commercial candies. You also have the option to control the ingredients, ensuring there are no unwanted preservatives. Plus, making these treats at home can be a healthier alternative, especially if you choose to use natural food colorings or flavorings.
What to Serve With Edible Crystal Rocks
Edible crystal rocks make for eye-catching decorations and additions to various dishes. Here are a few ideas on how to serve them:
- Decorate Desserts: Use them to adorn cakes, cupcakes, or cookies. Their crystal-like appearance can elevate any baked good.
- Party Favors: Place them in small bags and give them as tasty party favors at birthdays or celebrations.
- Tea or Coffee: Serve them alongside a cup of tea or coffee for an extra sweet treat.
- Ice Cream Sundaes: Sprinkle them over ice cream for an added crunch and a splash of color.
How to Store Edible Crystal Rocks
To keep your edible crystal rocks fresh, store them in an airtight container. Make sure that the container is kept in a cool, dry place. If stored properly, these sweet treats can last for several weeks. However, they’re so delicious, they probably won’t last that long!
Tips and Mistakes to Avoid
- Use Clean Equipment: Ensure all your equipment is clean when making the mixture. Any impurities can affect the crystallization process.
- Don’t Stir Once The Mixture Is In Jars: After pouring the syrup into jars, avoid stirring. This can disturb the crystal formation.
- Keep Jars Undisturbed: Choose a spot where the jars won’t be moved or shaken. Movement can disrupt the growing crystals.
- Patience Is Key: Be patient! Crystallization takes time, usually around 7 days. Don’t rush the process for the best results.
Variations
While the basic recipe is delightful on its own, consider these variations to add more fun to your edible crystal rocks:
- Flavored Crystals: Use flavored extracts (like vanilla or mint) in the syrup to give your crystals a unique taste.
- Themed Colors: For holidays, use thematic colors like red and green for Christmas or pastels for Easter.
- Sparkle Effect: Add edible glitter to the syrup for an extra sparkle to your crystals.
FAQs
1. How long do edible crystal rocks take to form?
Typically, it takes about 7 days for the crystals to form properly. The longer you leave them, the larger the crystals may become.
2. Can you reuse the sugar syrup mixture?
The sugar syrup is best used once for crystal formation. If you try to reuse it, the crystal formation may not be successful due to impurities.
3. Can I use other types of sugar?
Yes, you can experiment with different kinds of sugar; however, white granulated sugar is recommended for the best results in crystallization.
4. What happens if the crystals don’t form?
If crystals don’t form, it may be due to stirring the mixture too much or impurities in the jar. Make sure to follow the directions closely and keep the jars undisturbed.
5. Are there any tips for coloring the syrup?
Start with a few drops of food coloring and mix well. You can always add more if you want a deeper color, but it’s best to start light!
Making edible crystal rocks is not just a tasty treat; it’s also a fantastic educational project you can enjoy with family and friends. For a fun, colorful, and delicious experience, give this recipe a try—you won’t be disappointed!
Print
Edible Crystal Rocks
- Total Time: 10080 minutes
- Yield: 4 servings 1x
- Diet: Vegetarian
Description
A fun and simple project to create colorful edible crystal rocks that serve as a sweet treat or decorative element for desserts.
Ingredients
- 2 cups sugar
- 1 cup water
- 1/4 cup corn syrup
- Food coloring
- Wooden skewers
- Jars
Instructions
- Combine Ingredients: In a saucepan, mix the sugar, water, and corn syrup. Heat and stir until the sugar dissolves.
- Cool the Mixture: Remove from heat and let cool for a few minutes.
- Color Your Syrup: Divide the cooled mixture and add food coloring to each container.
- Prepare Jars: Pour the colored syrup into jars and place the wooden skewers inside.
- Allow Crystals to Form: Set jars in a cool place for about 7 days.
- Enjoy Your Creation: After a week, remove the skewers and enjoy the edible crystal rocks.
Notes
Ensure all equipment is clean and do not stir the mixture once in jars to allow crystals to form properly.
- Prep Time: 15 minutes
- Cook Time: 10 minutes
- Category: Candy
- Method: Crystallization
- Cuisine: American
Nutrition
- Serving Size: 1 serving
- Calories: 220
- Sugar: 50g
- Sodium: 5mg
- Fat: 0g
- Saturated Fat: 0g
- Unsaturated Fat: 0g
- Trans Fat: 0g
- Carbohydrates: 55g
- Fiber: 0g
- Protein: 0g
- Cholesterol: 0mg