


DIY Wax Paper Sun Catchers | Fun & Colorful Kids Craft
How to make DIY Wax Paper Sun Catchers
Making wax paper sun catchers is a delightful craft that both kids and adults can enjoy. They’re perfect for decorating windows and brightening up your space with colorful patterns. Let’s dive into how you can create these stunning pieces of art.
Ingredients:
- Wax paper (two sheets)
- Crayons (various colors)
- Cheese grater
- Iron
- Parchment paper or a thin cloth
- Scissors
- Hole punch (optional)
- String or ribbon (optional for hanging)
Directions:
-
Shred the Crayons: Start by peeling the wrappers off your crayons. Next, use a cheese grater to finely shred the crayons. You can mix different colors together for a unique design.
-
Prepare the Wax Paper: Take one sheet of wax paper and lay it flat on a clean, heat-safe surface. Spread the shredded crayon pieces evenly on one half of the wax paper.
-
Fold and Cover: Fold the wax paper over the crayon shavings. Then, place a piece of parchment paper or a thin cloth over the folded wax paper. This will protect your iron and prevent any mess.
-
Iron the Wax Paper: Set your iron to a low heat setting. Gently press the iron over the parchment paper for just a few seconds. Be careful not to leave the iron in one spot for too long, as it can create burns or melt the wax paper too much.
-
Check the Melting: After a few seconds, lift the parchment paper to check if the crayon has melted sufficiently. The colors should blend together beautifully. If they haven’t melted completely, cover it again and use the iron for a few more seconds.
-
Cut Out Shapes: Once the crayon pieces are thoroughly melted and the wax paper appears vibrant and colorful, let it cool completely. After cooling, use scissors to cut out your desired shapes (like flowers, stars, or circles).
-
Punch Holes (optional): If you want to hang your sun catchers, you can use a hole punch to make a hole at the top of each shape.
-
Display Your Artwork: Thread a string or ribbon through the hole and hang your sun catcher in a sunny window. Watch as the light shines through, creating rainbow colors in your room!
Why You’ll Love This DIY Wax Paper Sun Catchers
Creating wax paper sun catchers is not just about the end product; it’s the joyful process that makes it enjoyable. This craft is simple yet effective, perfect for kids of various ages. You’ll appreciate how easy it is to set up, and the end result fills your home with light and color. Plus, it’s a fantastic way for kids to express their creativity while developing motor skills.
Nutriments benefits
Although the DIY wax paper sun catchers aren’t edible and don’t provide any nutritional benefits, the activity of crafting itself can be beneficial. Engaging in arts and crafts encourages creativity, supports emotional expression, and helps develop fine motor skills. Crafting can also improve focus and concentration, making it a constructive way for kids to spend their time creatively.
What to Serve With DIY Wax Paper Sun Catchers
While these sun catchers aren’t food, you can serve them with some creative fun! After making sun catchers, you can turn the crafting session into an art party. Prepare some healthy snacks like apple slices with peanut butter, carrot sticks, or yogurt dipped with fruits. These snacks can help keep the energy high while everyone crafts away.
How to store DIY Wax Paper Sun Catchers
To store your completed sun catchers, find a flat and safe space where they won’t get bent or damaged. You can stack them between layers of tissue paper to prevent scratches or sticking together. If you wish to keep them safe for the next season, place them in an envelope or a small box labeled as “Crafts.” Make sure to keep them in a cool, dry place to avoid any melting or distortion.
Tips and mistakes to avoid
- Mistake 1: Using a high heat setting. Always keep the iron on a low setting to avoid ruining your wax paper and burning the crayons.
- Tip: Check the melting every few seconds. It is better to melt in short increments to avoid overdoing it.
- Mistake 2: Not layering the parchment paper effectively. Make sure to cover the wax paper entirely before using the iron.
- Tip: If you don’t have a cheese grater, you can also break the crayons into small pieces and place them between the layers of paper for melting.
- Tip: Encourage kids to be creative with their color combinations; they can experiment with layering different colors to see what happens!
Variation
You can customize your wax paper sun catchers by trying different techniques. Instead of simply melting crayon shavings, you can cut out colorful pieces of tissue paper to create exciting patterns. You can also experiment with different shapes — from leaves to animals — making the crafting process even more engaging. Add glitter before melting for an extra sparkle effect!
FAQs
-
Can I use just one color of crayon?
Yes, you can use one color or a mix of several! It’s entirely up to your creativity and the effect you want to achieve. -
How long does it take to make these sun catchers?
Making wax paper sun catchers can take about 30-40 minutes, including prep time and cleanup. It’s a quick and fun activity! -
Is it safe for young children?
This craft is best suited for older children. Young kids should have adult supervision, especially when using the iron, to ensure safety. -
What if I don’t have wax paper?
If you don’t have wax paper, you could try using parchment paper, but results may vary as it may not melt the crayons in the same way. -
Can I use crayons in different forms, like oil pastels?
While crayons work best, oil pastels can be used, but they may create a different texture and effect. Experiment to see what you like!
Crafting DIY wax paper sun catchers is not just a fun activity but also a beautiful way to bring color and joy into your home. Gather your materials, have fun with your kids, and let everyone’s creativity shine!
Print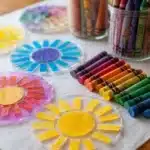
DIY Wax Paper Sun Catchers
- Total Time: 40 minutes
- Yield: Multiple sun catchers
- Diet: Non-Dietary
Description
A delightful craft for kids and adults to create colorful wax paper sun catchers that brighten up your space.
Ingredients
- 2 sheets of wax paper
- Various colors of crayons
- 1 cheese grater
- 1 iron
- Parchment paper or thin cloth
- 1 pair of scissors
- 1 hole punch (optional)
- String or ribbon (optional for hanging)
Instructions
- Peel the wrappers off the crayons and shred them using a cheese grater.
- Lay one sheet of wax paper flat and spread the shredded crayon pieces evenly on one half.
- Fold the wax paper over the crayon shavings, covering it with a piece of parchment paper or a thin cloth.
- Set the iron to low heat and press it gently over the parchment paper for a few seconds.
- Check the melting and repeat if necessary until the colors blend beautifully.
- Let it cool completely and then cut out your desired shapes.
- If hanging, use a hole punch to make a hole at the top of each shape, then thread a string or ribbon through.
- Display your artwork in a sunny window.
Notes
Ensure safety when using the iron, especially with young children. Encourage creativity in color combinations.
- Prep Time: 10 minutes
- Cook Time: 30 minutes
- Category: Crafts
- Method: Crafting
Nutrition
- Serving Size: N/A
- Calories: 0
- Sugar: 0g
- Sodium: 0mg
- Fat: 0g
- Saturated Fat: 0g
- Unsaturated Fat: 0g
- Trans Fat: 0g
- Carbohydrates: 0g
- Fiber: 0g
- Protein: 0g
- Cholesterol: 0mg