
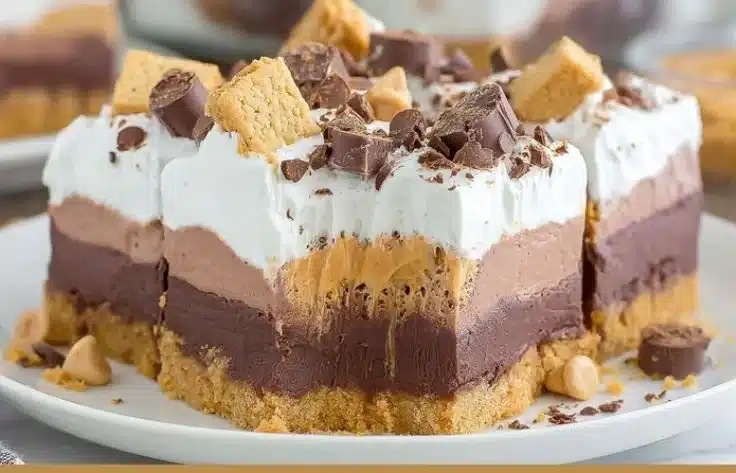

How to make Chocolate Peanut Butter Dream Bars
Ingredients:
| Ingredient | Amount |
|————————————-|———————|
| Peanut butter sandwich cookies | 16 oz |
| Butter | 4 tablespoons, melted|
| Cream cheese | 6 ounces, room temperature |
| Confectioners’ sugar | ½ cup |
| Creamy peanut butter | ⅓ cup |
| Vanilla extract | ½ teaspoon |
| Cool Whip | 8 oz, divided |
| Instant chocolate pudding mix | 3.9 oz |
| Milk | 1 ½ cups |
| Milk chocolate chips | ¼ cup |
| Peanut butter chips | ¼ cup |
Directions:
Step 1: Make the Cookie Crust
Start by finely crushing 20 peanut butter sandwich cookies. You can use a food processor or blender for this step. Once crushed, mix the crumbs with melted butter until it is evenly moistened. Press this mixture firmly into an 8 x 8-inch pan. After that, freeze the crust for 30 minutes.
Pro Tip: Pressing firmly helps to avoid a crumbly base when you slice the bars later on.
Step 2: Prepare the Chocolate Pudding
In a bowl, whisk together the chocolate pudding mix and milk until the mixture is smooth and thick. After whisking, place it in the refrigerator to fully set.
Pro Tip: Make sure the pudding is fully chilled; this keeps it from mixing into the other layers.
Step 3: Mix the Peanut Butter Cream Layer
In a separate bowl, beat the cream cheese until it becomes smooth. To this, add confectioners’ sugar, creamy peanut butter, and vanilla extract. Mix everything until it is creamy and well combined.
Pro Tip: Using room-temperature cream cheese prevents lumps from forming.
Step 4: Fold in Whipped Topping
Take 1 cup of Cool Whip and gently fold it into the peanut butter mixture until it is light and fluffy.
Pro Tip: Folding slowly keeps the mixture airy, which is essential for the final texture.
Step 5: Assemble the Layers
Start by spreading the peanut butter cream mixture over the crust. Next, add the chilled chocolate pudding layer on top of that. Finally, spread the remaining Cool Whip over the pudding.
Pro Tip: Using an offset spatula makes it easier to create clean layers.
Step 6: Chill and Set
Now it’s time to chill your creation! Place the assembled dessert in the refrigerator for about 2 hours. Once that’s done, put it in the freezer for an additional 30 minutes before slicing.
Pro Tip: A brief freeze creates neat, clean cuts when slicing.
Step 7: Garnish and Serve
Before serving, take the remaining peanut butter sandwich cookies and crush them. Sprinkle these crumbs along with milk chocolate and peanut butter chips over the top just before serving. Enjoy!
Why You’ll Love This Chocolate Peanut Butter Dream Bars
Chocolate Peanut Butter Dream Bars combine two beloved flavors: chocolate and peanut butter. The creamy layers and crunchy crust create a delightful textural contrast that is hard to resist. Additionally, these bars are easy to make and don’t require baking, making them a perfect treat for any occasion. Whether you’re planning a family gathering, a picnic, or just a cozy night at home, these bars are sure to impress everyone.
Nutritional Benefits
While indulging in dessert, it’s always nice to be mindful of nutritional content. Here are a few points about some ingredients:
- Peanut Butter: Rich in protein and healthy fats, peanut butter provides energy and keeps you feeling fuller longer.
- Cream Cheese: A source of calcium, cream cheese can contribute to your daily dairy intake.
- Milk: Offers a good dose of vitamins and minerals, especially calcium, which is essential for bone health.
What to Serve With Chocolate Peanut Butter Dream Bars
These dessert bars pair beautifully with various beverages and sides. Some great options include:
- Coffee or Espresso: A warm cup of coffee enhances the dessert’s flavors while providing a nice contrast.
- Milk: A classic choice that balances the richness of the bars.
- Fruit: Fresh berries or sliced bananas can lighten the sweetness and add a refreshing touch.
How to store Chocolate Peanut Butter Dream Bars
To keep your Chocolate Peanut Butter Dream Bars fresh for longer, you should store them properly. Here’s how:
- In the refrigerator: Cover the bars with plastic wrap or store them in an airtight container. They will stay fresh for about a week.
- In the freezer: If you want to make them last longer, you can freeze the bars. Just be sure to wrap them tightly in plastic wrap and foil or place them in an airtight container. They can stay good in the freezer for up to three months. Allow them to thaw in the refrigerator before serving.
Tips and Mistakes to Avoid
Making dessert can be fun, but avoiding a few common mistakes can lead to a better outcome:
- Don’t rush the chilling process: Allowing each layer to set properly is crucial for maintaining the structure of the bars.
- Use fresh ingredients: Ensure that your ingredients, especially the cream cheese and Cool Whip, are fresh for the best taste.
- Be gentle when folding: When adding Cool Whip to the peanut butter mixture, be gentle to maintain the airy texture.
Variations
Feel like switching things up? Here are a few variations to consider:
- Add Nuts: Chop up some peanuts or walnuts and mix them into the peanut butter layer for added crunch.
- Change the pudding flavor: Try using vanilla pudding instead of chocolate for a different flavor profile.
- Use different cookies: Experiment with different cookie types, like Oreo cookies or chocolate chip cookies, for the crust.
FAQs
1. Can I make this recipe ahead of time?
Yes! You can make Chocolate Peanut Butter Dream Bars a day or two in advance. Just store them in the refrigerator until you’re ready to serve.
2. Can I substitute any ingredients?
Absolutely! You can use other types of cookies for the crust or swap creamy peanut butter with crunchy peanut butter for added texture.
3. Is it necessary to freeze the bars?
Freezing isn’t strictly necessary, but it helps achieve cleaner cuts. If you prefer, you can chill them in the refrigerator for a longer period instead.
4. Can I use homemade whipped cream instead of Cool Whip?
Yes, if you prefer homemade whipped cream, you can use it instead of Cool Whip. Just make sure it’s well-whipped for the best results.
5. How can I make these bars gluten-free?
To make the bars gluten-free, use gluten-free peanut butter cookies for the crust and ensure all other ingredients are gluten-free.
With these steps and tips, you are ready to make your very own Chocolate Peanut Butter Dream Bars that not only taste amazing but are also fun to prepare. Enjoy your delicious creation!